Table of Contents 目录
I have always wanted to self-host a Phabricator for task management, as I found KDE's Phabricator pretty useful for this. But one day Tofu told me that she likes Phabricator for a different reason: stacked diffs. After some research, I found out that Phabricator has been discontinued while there is an active fork called Phorge. And I began to use it.
Why is Phorge intriguing? 为什么 Phorge 吸引人呢?
The main reason I wanted Phorge was indeed the task management system. GitLab issues has almost nonexistent task management features, at least in the free version. (Paid versions may have more, like mutually-exclusive tags, but I frown upon the idea of using non-libre software for hosting my code, or why wouldn't I use GitHub.)
Stacked diffs, while taking quite some time for me to understand at first,
do solve an important problem for my workflow when I write code for the
Kazv Project. In the original workflow, I needed to branch out from trunk1,
write code, add a changelog entry in the changelogs folder, commit, then
open a merge request and wait for our other developer to review it.
In the mean time, if I wanted to work on other things, I needed to branch out from trunk again, and follow the same procedure, all while waiting for reviews from the other developer. If the two branches touched the same file, conflicts will arise, and the problems are:
- I usually want to use the new features by myself immediately. This means I need to maintain two states of the same set of changes (one on my local branch, one rebased upon trunk).
- The two states may well have conflicts against each other.
- I need to do this for each of my merge requests.
Stacked diffs solves this problem, because the unit of code reviews is not
restricted to the difference between trunk and one of the other branches.
Instead, it can be any diff. So, if I write feature A upon trunk and then
go on to write feature B, I can start with A, and then submit the diff
between A and B for review. The state only needs to be maintained once.
And then I can git format-patch and copy them into my /etc/portage/patches
to have my package manager install the patched version onto my system
so that I can use every new feature I just wrote.
Setting up Phorge to mirror a repository from GitLab 让 Phorge 从 GitLab 镜像一个仓库
Installing Phorge and Arcanist2 is covered by their
official docs.
I will omit the steps here (my set up is using Docker, so there are some
slight differences, maybe one day I will write another post about this).
One thing to note is that if you are also
on Gentoo, you will need the curl USE flag on php to use Arcanist:
] euse -E curl -p dev-lang/php
To use Phorge for code reviews, we first need to host the repository on Phorge. Phorge can be set up to pull from another git repository, or to push to another one, or both. But first, we need to create a repository in Diffusion.
First, we go to the main page of Diffusion, and click on Create Repository.
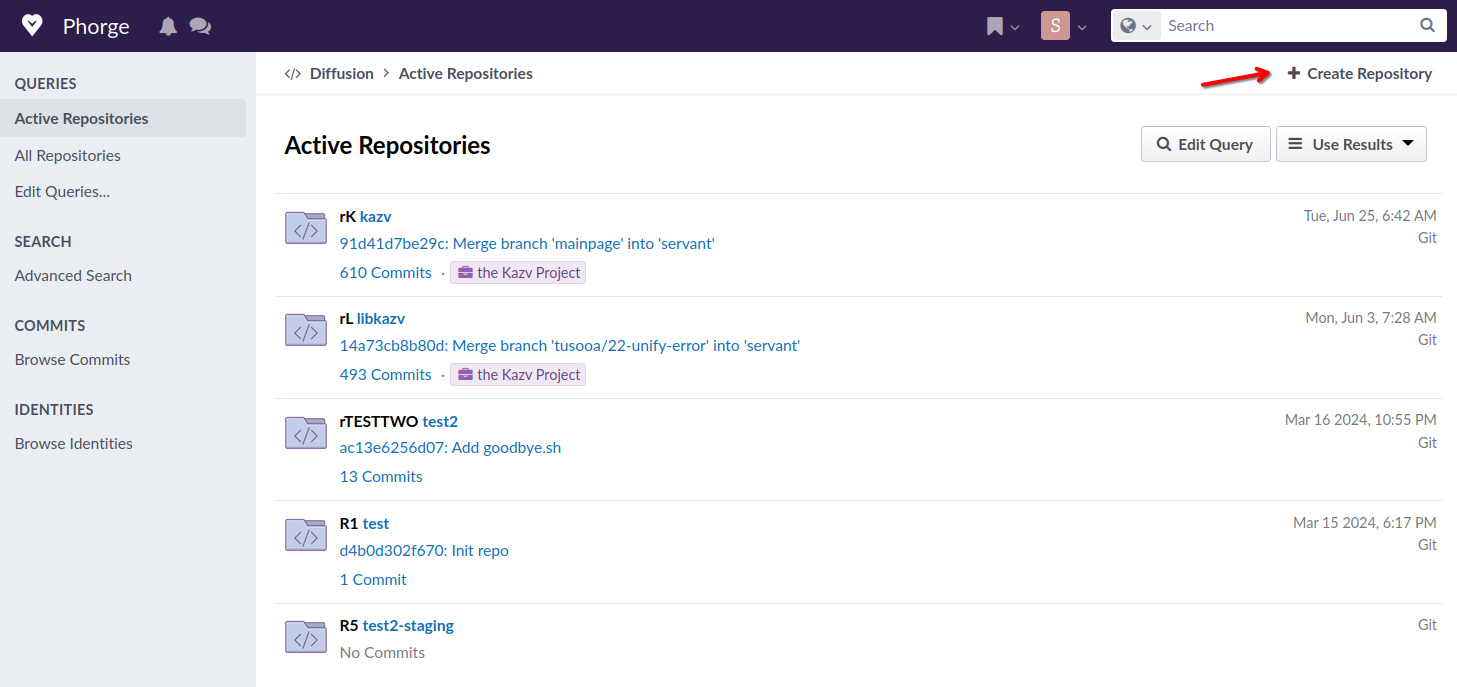
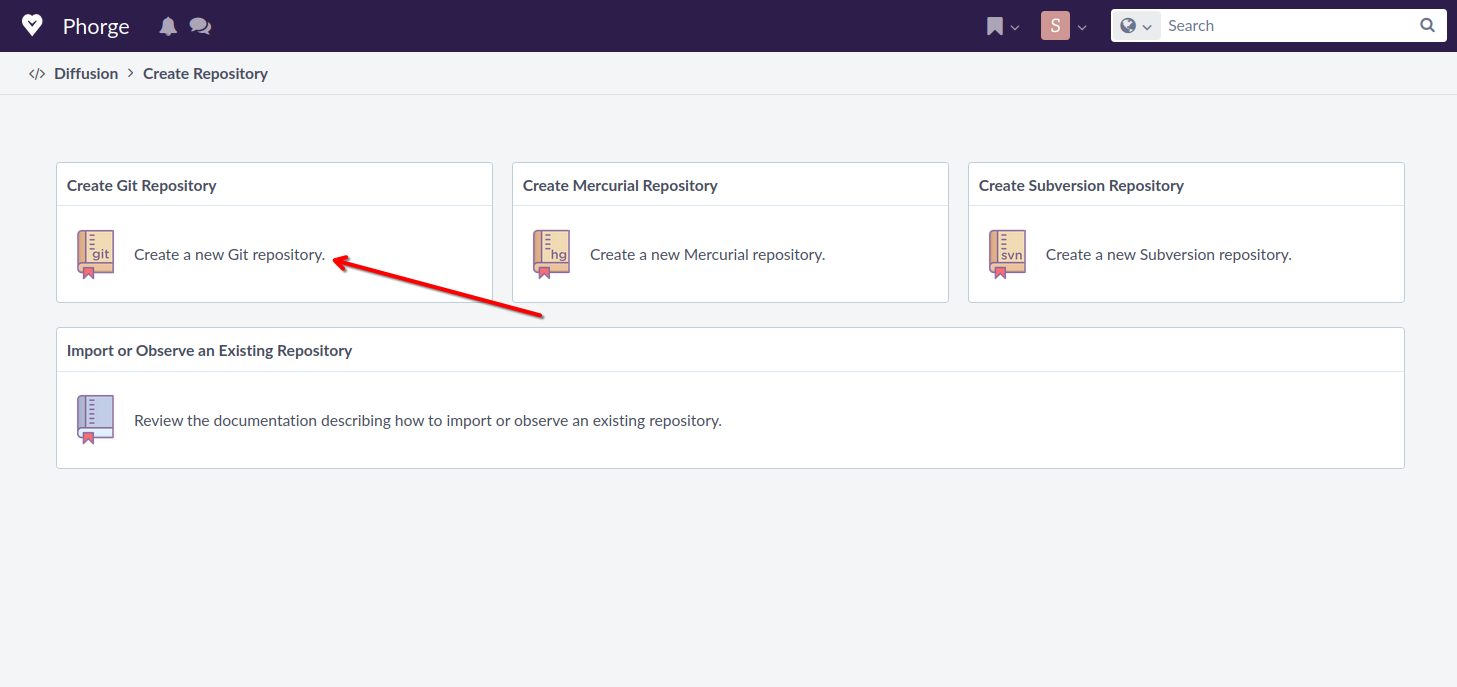
It will prompt us to choose a version control system. We choose Git, of course.
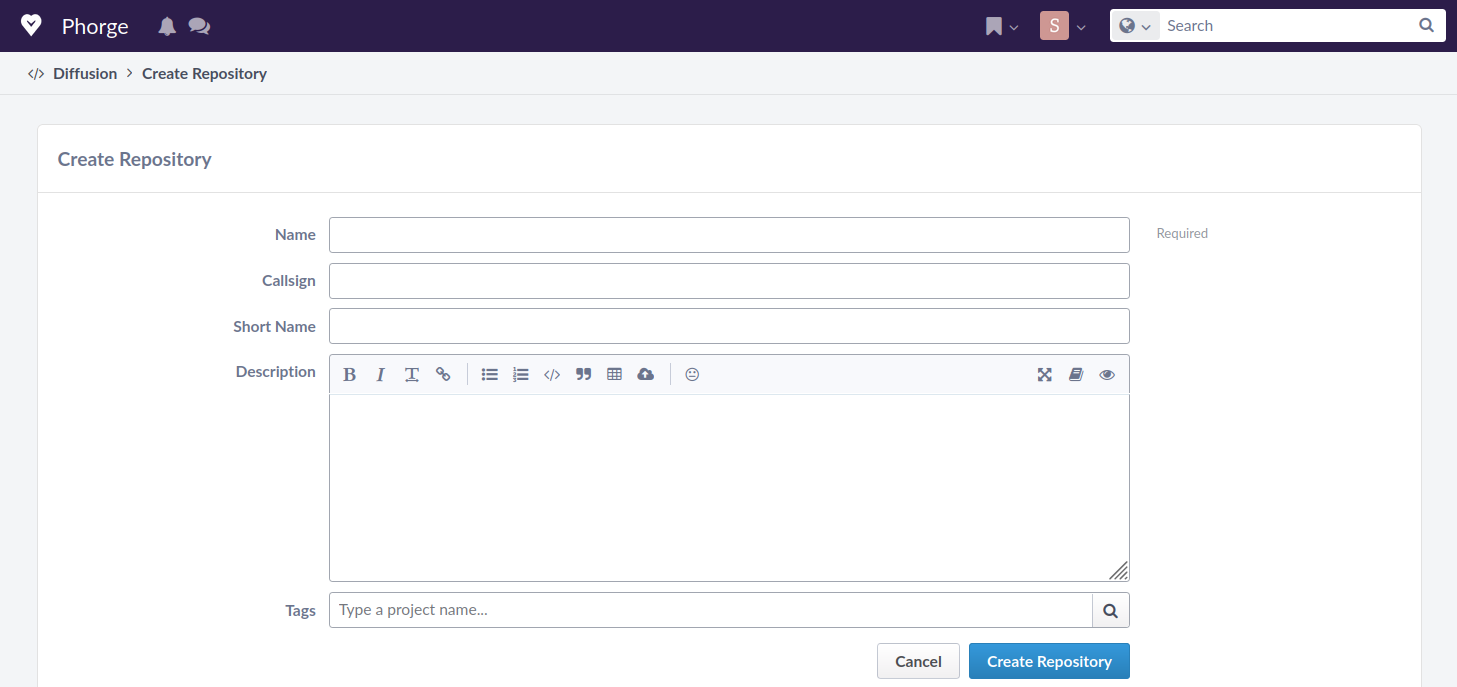
It will then give us a form. Give the repository a name you like. The callsign is a string composed of only the ASCII capital letters A-Z, and must be unique across the Phorge installation. It is recommended to give the repository a callsign as we might need this for Arcanist to find it properly.
After submitting the form, we will be directed to the overview page of the repository. Click on URIs on the left sidebar.
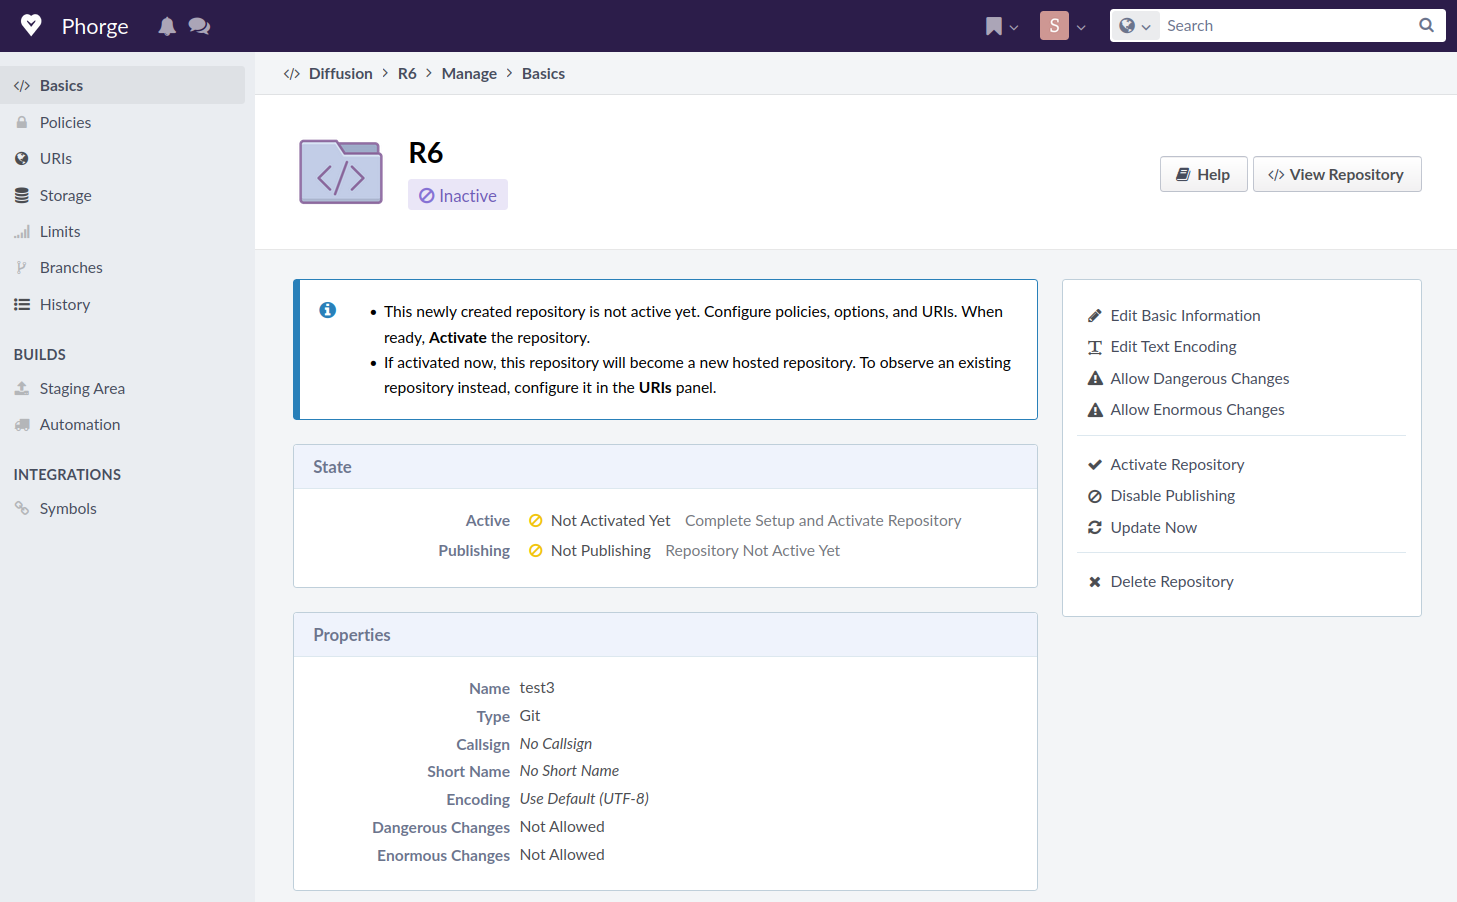
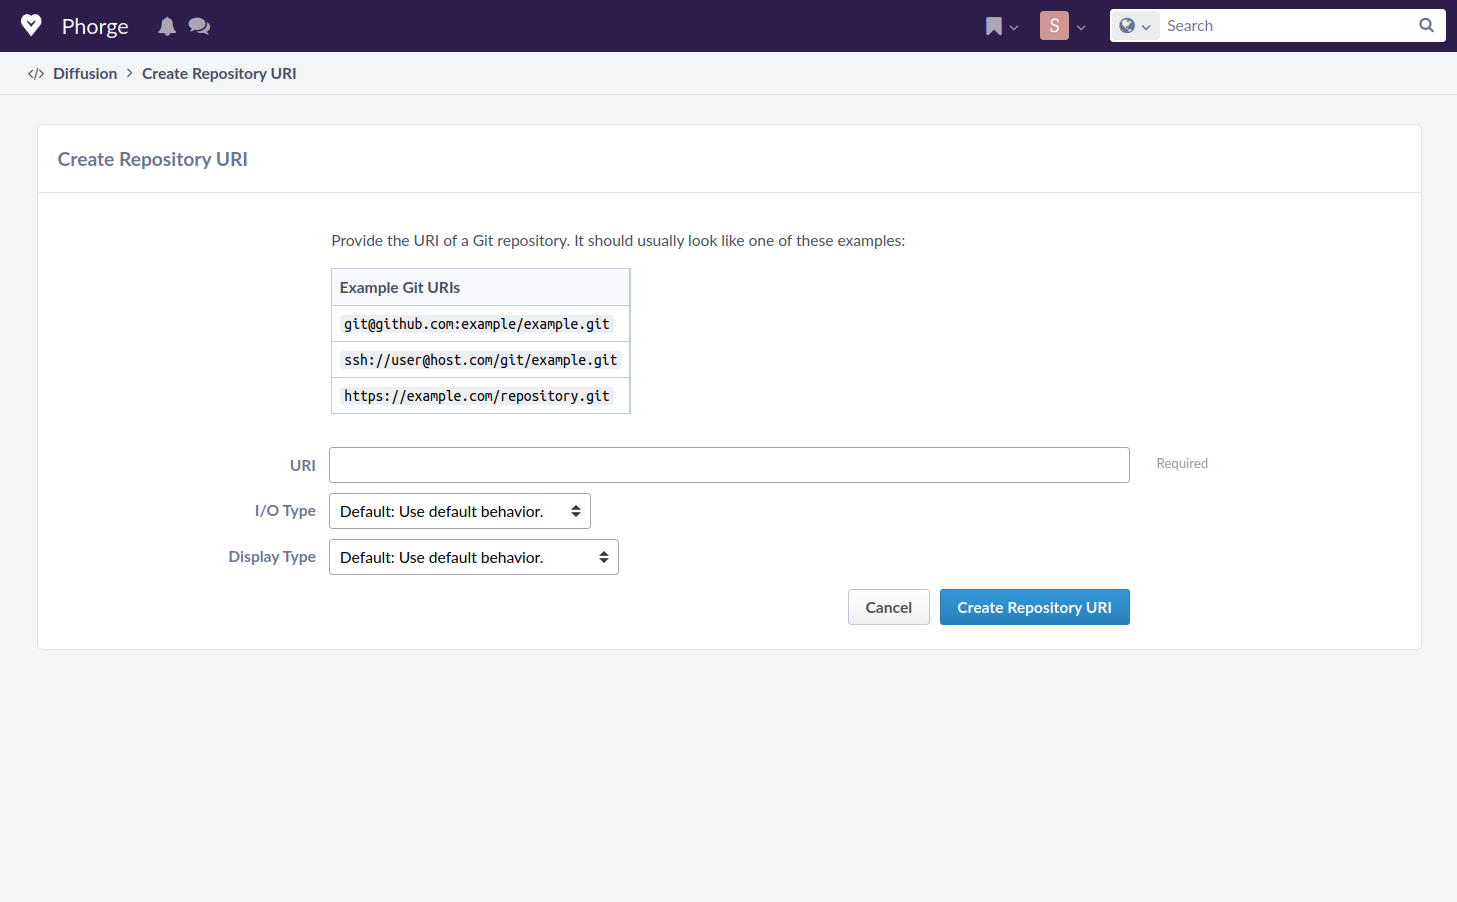
We can see that there already are default URIs in the list, but we cannot use them yet (because the repository has not yet been activated). As we want to mirror them from GitLab, we will add another URI pointing to GitLab. Click on Add New URI on the right sidebar.
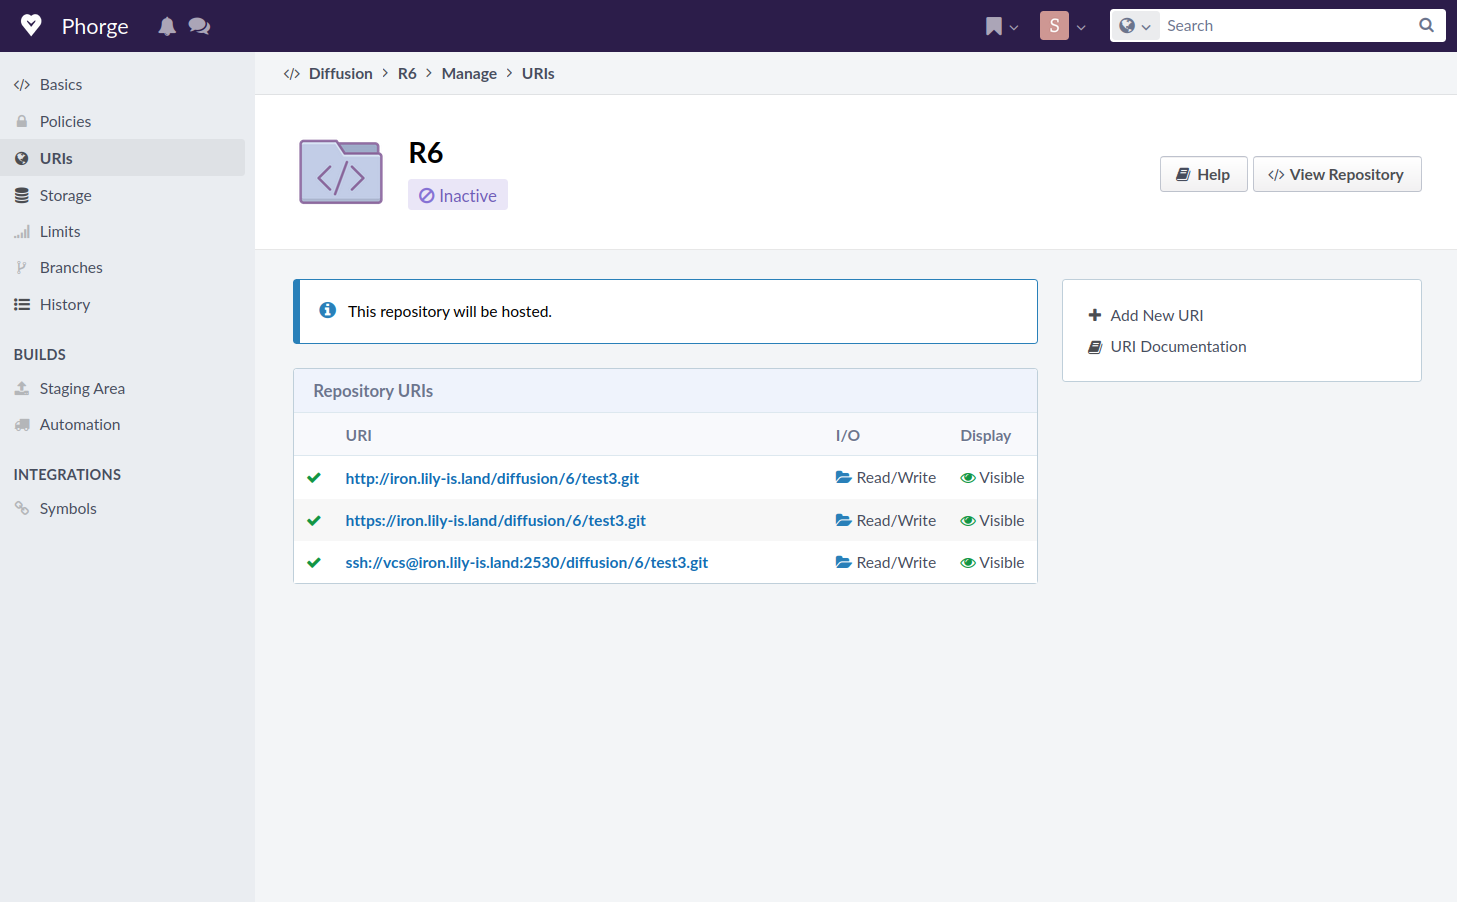
Copy the clone link from your GitLab repository and paste it into the URI entry. In I/O Type, select Observe: Copy from a remote. If the GitLab repository is public, using the https clone link would suffice. If not, use the ssh clone link, and add a credential by generating a new ssh key, pasting the private key into Phorge, and the public key into your GitLab account.
Finally, we can go back to the Basics page and click Activate Repository on the right sidebar. You will soon see your repository being imported.
.arcconfig
We need to make a .arcconfig file in the repository root so that Arcanist
will know where to find the repository on our Phorge server. Replace the URI
and callsign to the one you have.
{
  "phabricator.uri" : "https://iron.lily-is.land/",
  "repository.callsign": "TESTTWO"
}
It is recommended to commit .arcconfig into the repository. Why not create
a diff out of it to test that it works?
] git add .arcconfig
] git commit
] arc diff HEAD^
If you have not used Arcanist before, it will ask you to log in. Otherwise, your favourite editor (hopefully) will open a file asking you to fill out a Summary and a Test Plan. After you save and close the file, it will give you the corresponding Revision URI. You can open it to review it. Here is a sample Revision page.
But what about CI/CD? 那 CI/CD 呢?
GitLab has great CI/CD tooling. How to make use of it when submitting diffs through Differential Revisions? There is one good news and one bad news. The bright side is that it has a built-in tool called Harbormaster, which can be set up to do certain things when you submit or change a Revision. The dark side? Well... the only thing it can do right now is making an HTTP request.
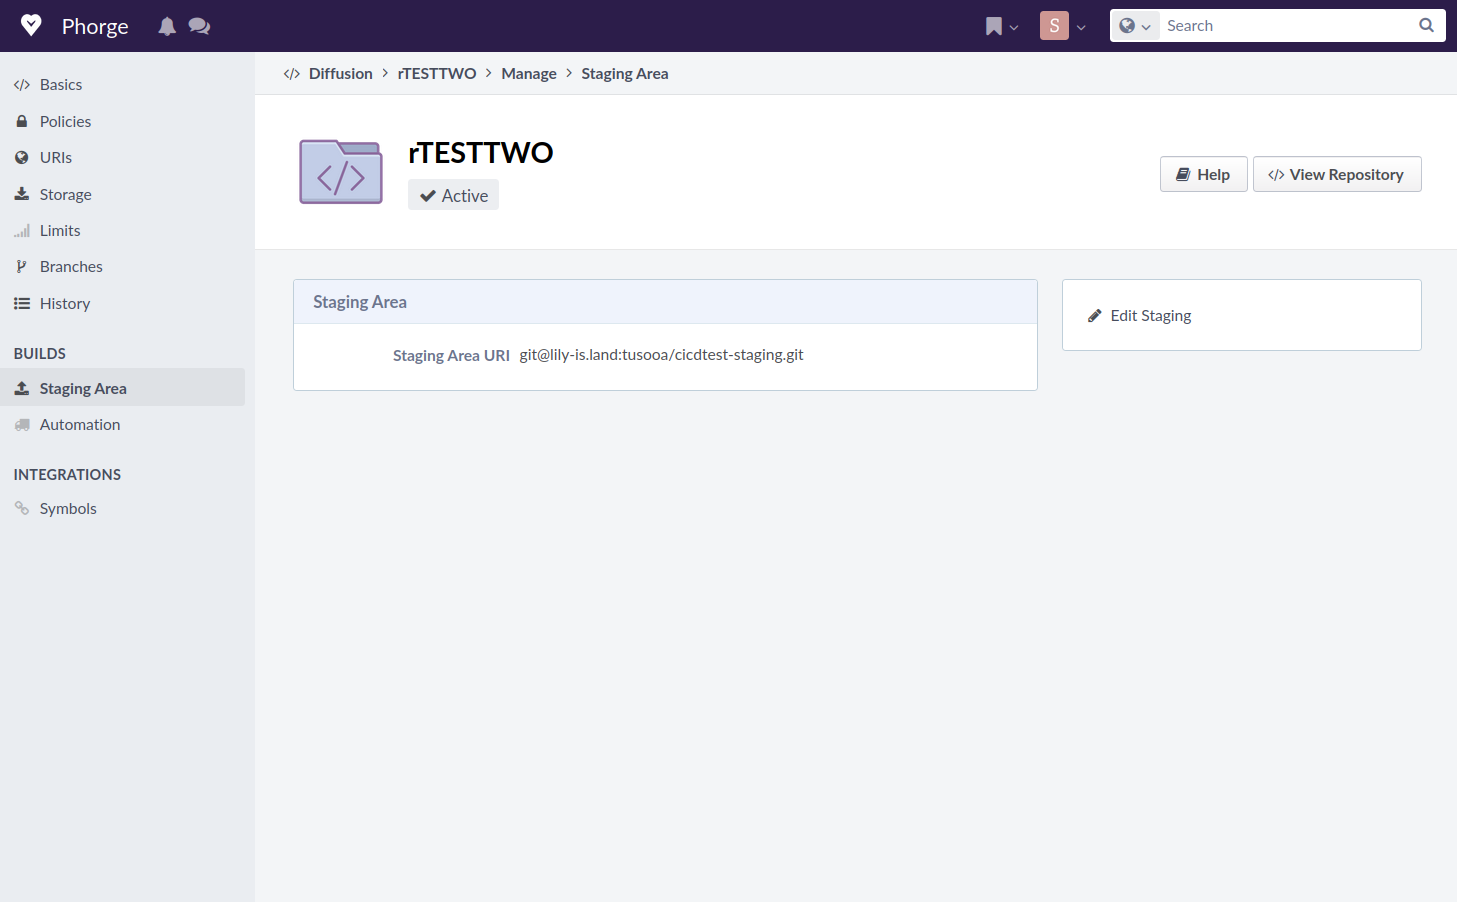
The first key is to use a Phorge feature called Staging Area. A staging
area is an url that Arcanist will push your changes to. There is no need that
the Phorge server has write access to that url. Only the user who is using
Arcanist need to have access. To use GitLab CI, we want the staging area to
be on GitLab. For this, we create another GitLab repository. Then, from the
Phorge repository, click Staging Area on the left sidebar. Click on
Edit Staging on the right, and paste the URI of the newly created
GitLab repository into it. This URI will be used to push when you submit
diffs using arc diff, so use a protocol (https or ssh+git) that you will
be comfortable with.
arc diff will push two tags to the staging area: phabricator/diff/X
and phabricator/base/X. The former corresponds to the state after
the diff, and the latter before it. Of course, we want to run our
pipelines on the phabricator/diff/X tags. The first thing you
might think of is to have the pipelines run when the tag being pushed
starts with phabricator/diff/. That is a good idea, but then you
do not have a way to report the status of the build directly to Phorge,
and you will need to find the corresponding pipeline manually.
Instead, we will have Phorge trigger a build on GitLab. Add the
following to your .gitlab-ci.yml in your main repository.
workflow:
  rules:
    - if: '$CI_PIPELINE_SOURCE == "trigger"'
    - if: '$CI_PIPELINE_SOURCE == "merge_request_event"'
      when: never
    - if: $CI_COMMIT_BRANCH
    - if: '$CI_COMMIT_TAG !~ /^phabricator\//'
Triggering the build from Phorge 从 Phorge 触发构建
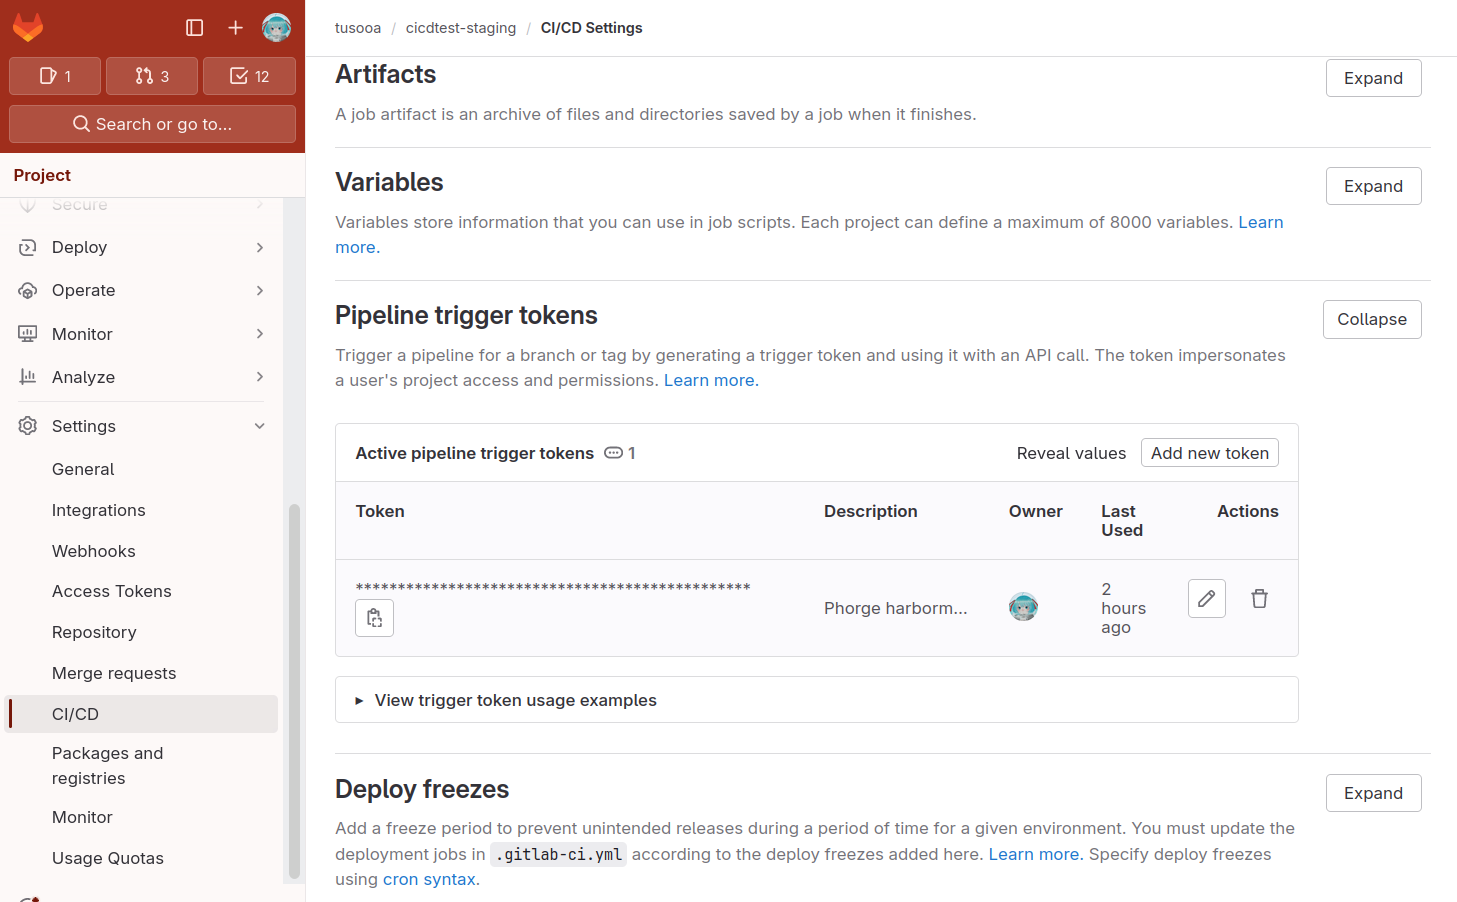
we will need to create a trigger token for the staging area repository. Go to Settings -> CI/CD, then in Pipeline trigger tokens, click on Add new token. Follow the instructions there.
Go to Harbormaster on Phorge, click on Manage Build Plans on the left sidebar, and then Create Build Plan on the top-right (by default, you will need to be an administrator of the Phorge instance to do this). After you created the build plan, click Add Build Step.
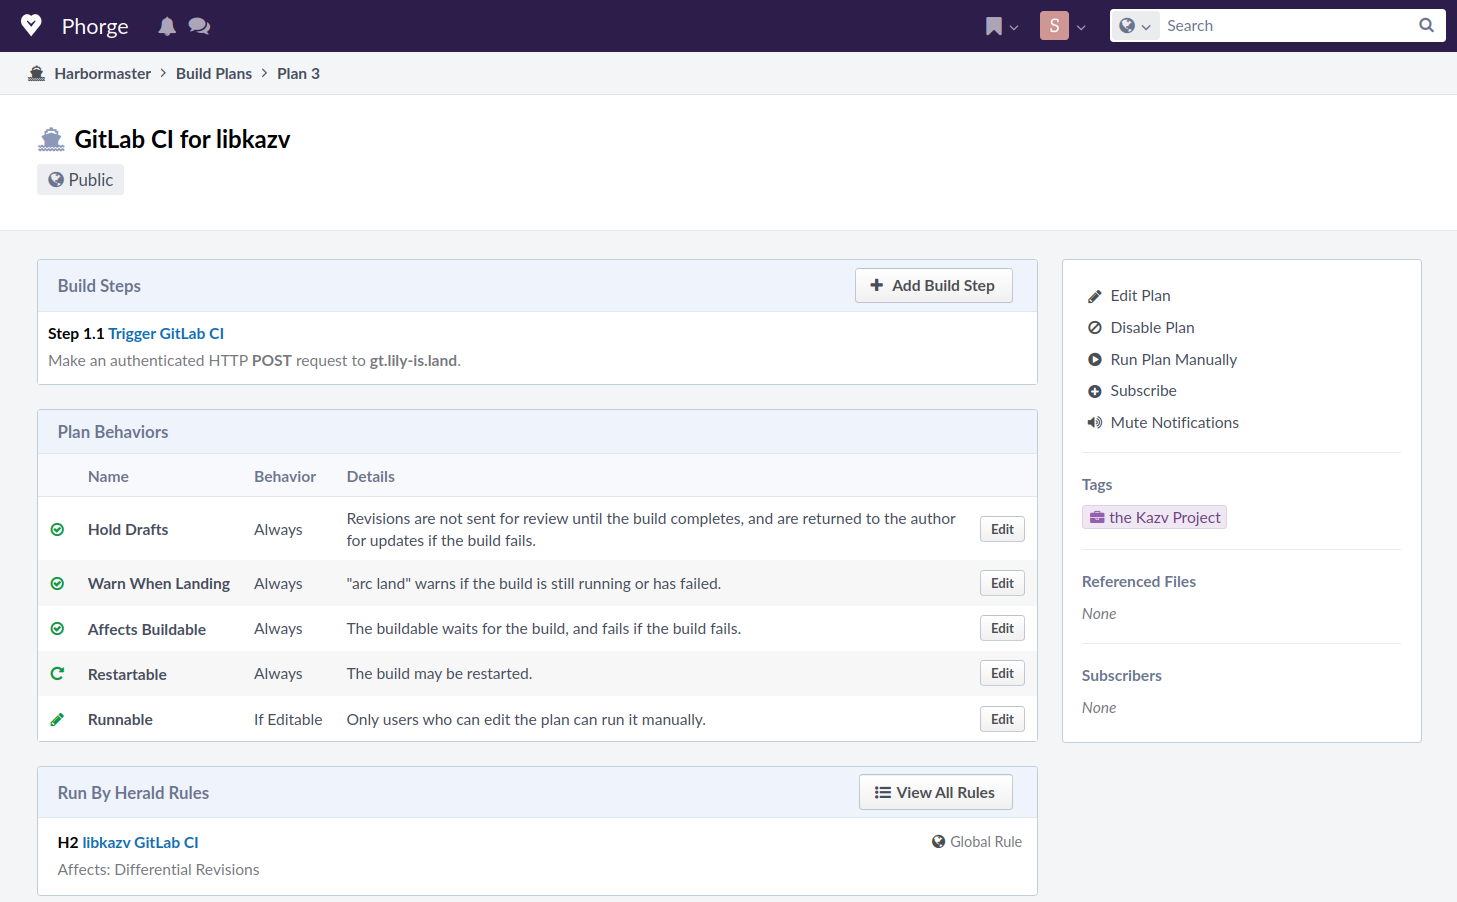
Choose Make HTTP Request from the list.
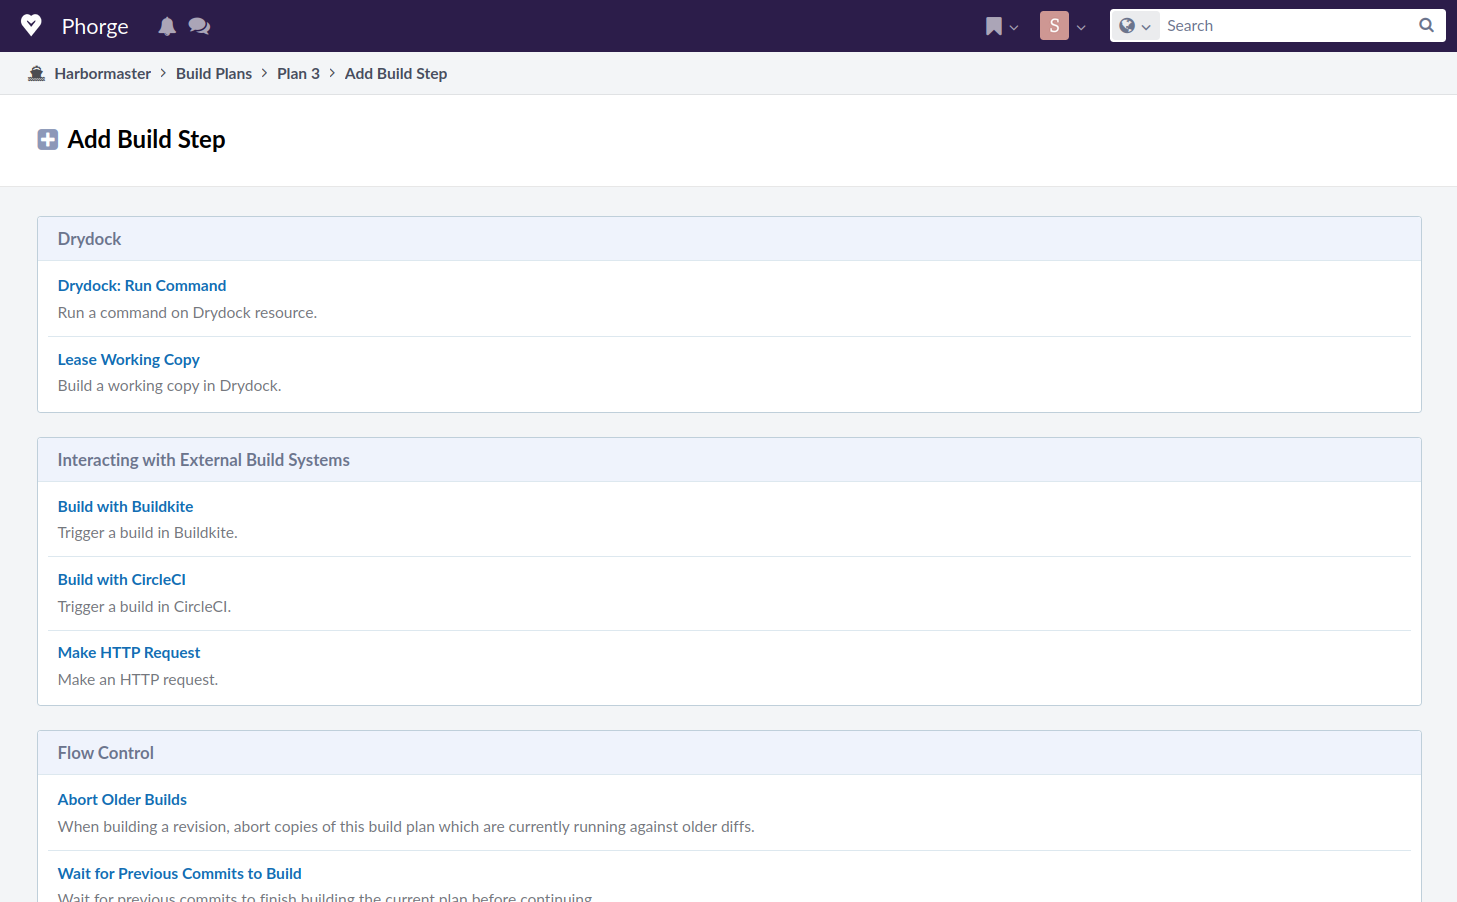
This is where the limitations of Harbormaster comes in our way, as you can see on this page. First, it does not support a request body, even though it can send POST requests. Second, it can only send Basic Auth credentials. Even though GitLab supports trigger tokens provided by a query parameter, this is not a recommended way because your token will then be exposed to everyone who can see the diff you submitted.

Proxying GitLab requests 代理 GitLab 的请求
We will use nginx to reverse-proxy our requests and rewrite a Basic
Auth header into a query parameter. This will take in the user part
of a Basic Auth header and add it to the query parameter called token.
Replace <gitlab> in the following
file with the address and port your GitLab is listening to. For example,
you might write proxy_pass http://localhost:8964;. Remember not to
have a trailing slash after it.
server {
 listen 0.0.0.0:443 ssl;
 listen [::]:443 ssl;
 server_name gt.lily-is.land;
 server_tokens off;
 ssl_certificate /etc/letsencrypt/live/gt.lily-is.land/fullchain.pem;
 ssl_certificate_key /etc/letsencrypt/live/gt.lily-is.land/privkey.pem;
 location /api {
  rewrite ^(.+)$ $1?token=$remote_user break;
  proxy_pass http://<gitlab>;
  proxy_redirect off;
  proxy_set_header Host $http_host;
  proxy_set_header X-Real-IP $remote_addr;
  proxy_set_header X-Forwarded-For $proxy_add_x_forwarded_for;
  proxy_set_header X-Forwarded-Proto $scheme;
  proxy_set_header X-Forwarded-Protocol $scheme;
  proxy_set_header X-Url-Scheme $scheme;
 }
 access_log /var/log/nginx/gitlab_access.log;
 error_log /var/log/nginx/gitlab_error.log;
}
Two-step trigger for GitLab GitLab 的两步触发器
Although GitLab offers a way to trigger a pipeline without using the request
body, it does not work in our case, because our tag name phabricator/diff/X
has slashes in it. (GitLab docs say it works if you urlencode the slash, but
I tried, and it does not, at least when called from Phorge.) Instead, we use
a simple branch name, servant. Add the following to the .gitlab-ci.yml
file in the servant branch of your staging repository.
workflow:
  rules:
    - if: '$CI_PIPELINE_SOURCE == "trigger"'
stages:
  - trigger
trigger-build:
  stage: trigger
  image: curlimages/curl
  script:
    - 'curl --request POST --form token="$TRIGGER_TOKEN" --form ref=phabricator/diff/"$DIFFID" --form "variables[TARGET_PHID]=$TARGET_PHID" "https://lily-is.land/api/v4/projects/$CI_PROJECT_ID/trigger/pipeline"'
And in your staging repository,
add a CI variable TRIGGER_TOKEN, masked and protected, with the
value set to the trigger token you just generated.
Now go back to Harbormaster's Add Build Step page, we have collected everything
we need to trigger a pipeline.
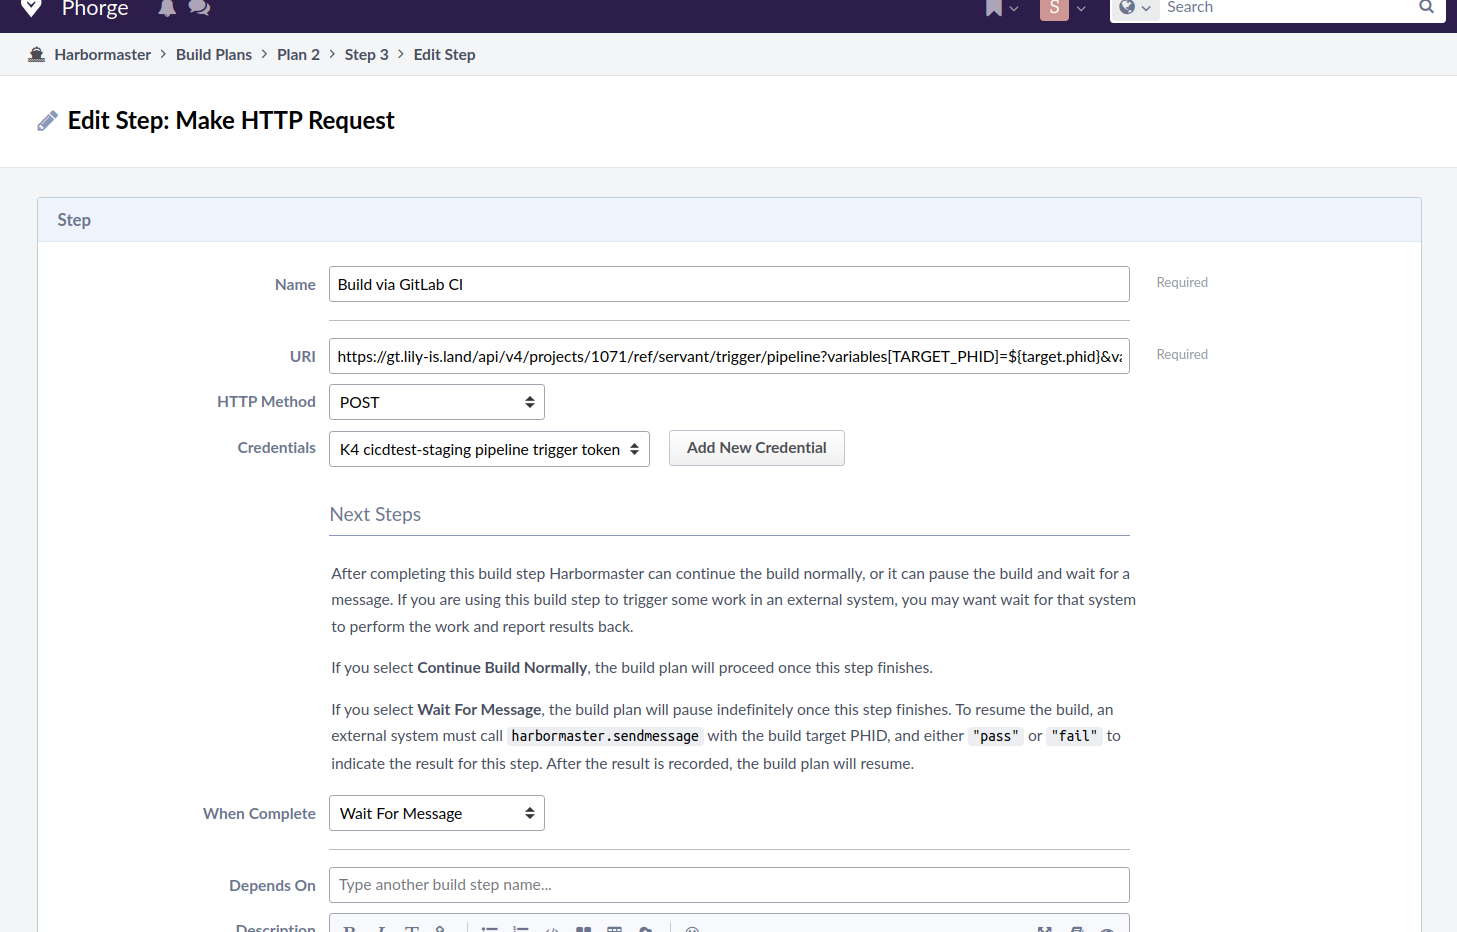
Put https://<gitlab>/api/v4/projects/<project-id>/ref/servant/trigger/pipeline?variables[TARGET_PHID]=${target.phid}&variables[DIFFID]=${buildable.diff}
in the URI field. Replace <gitlab> with the publicly accessible URI
of your GitLab instance, and <project-id> with the project id of your
staging repository. Choose POST as the HTTP Method.
In Credentials, Add New Credential, and put the trigger token into
Login/Username field, leaving Password empty. Choose Wait For Message
for When Complete.
Trigger a build automatically 自动触发构建
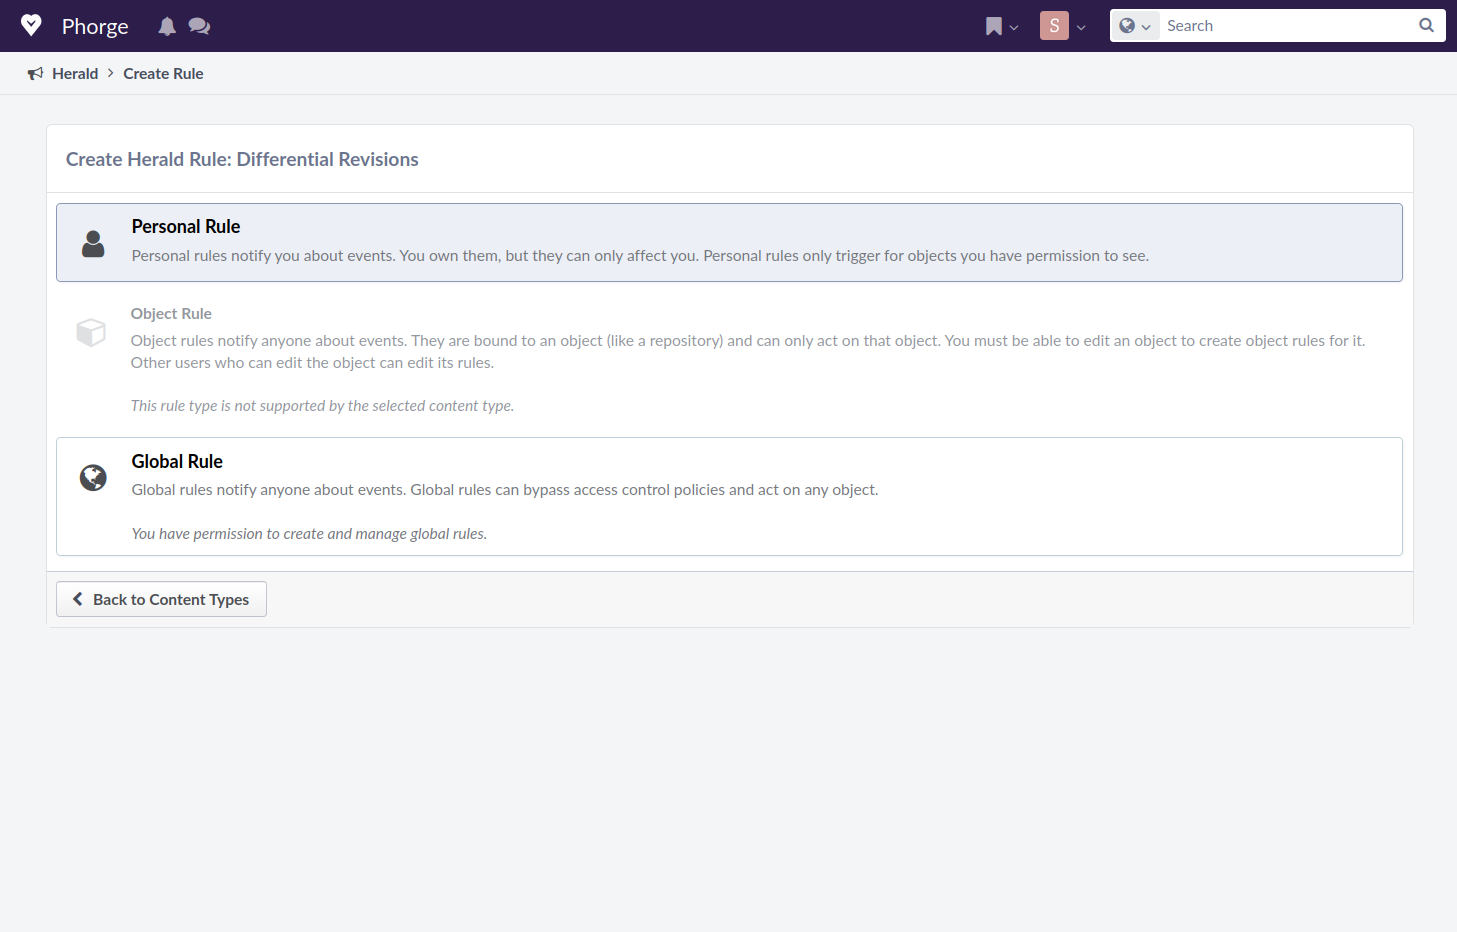
You will need to create a Herald rule for this. As an administrator, go to Herald in Phorge, and click on Create Herald Rule. Choose Differential Revisions.
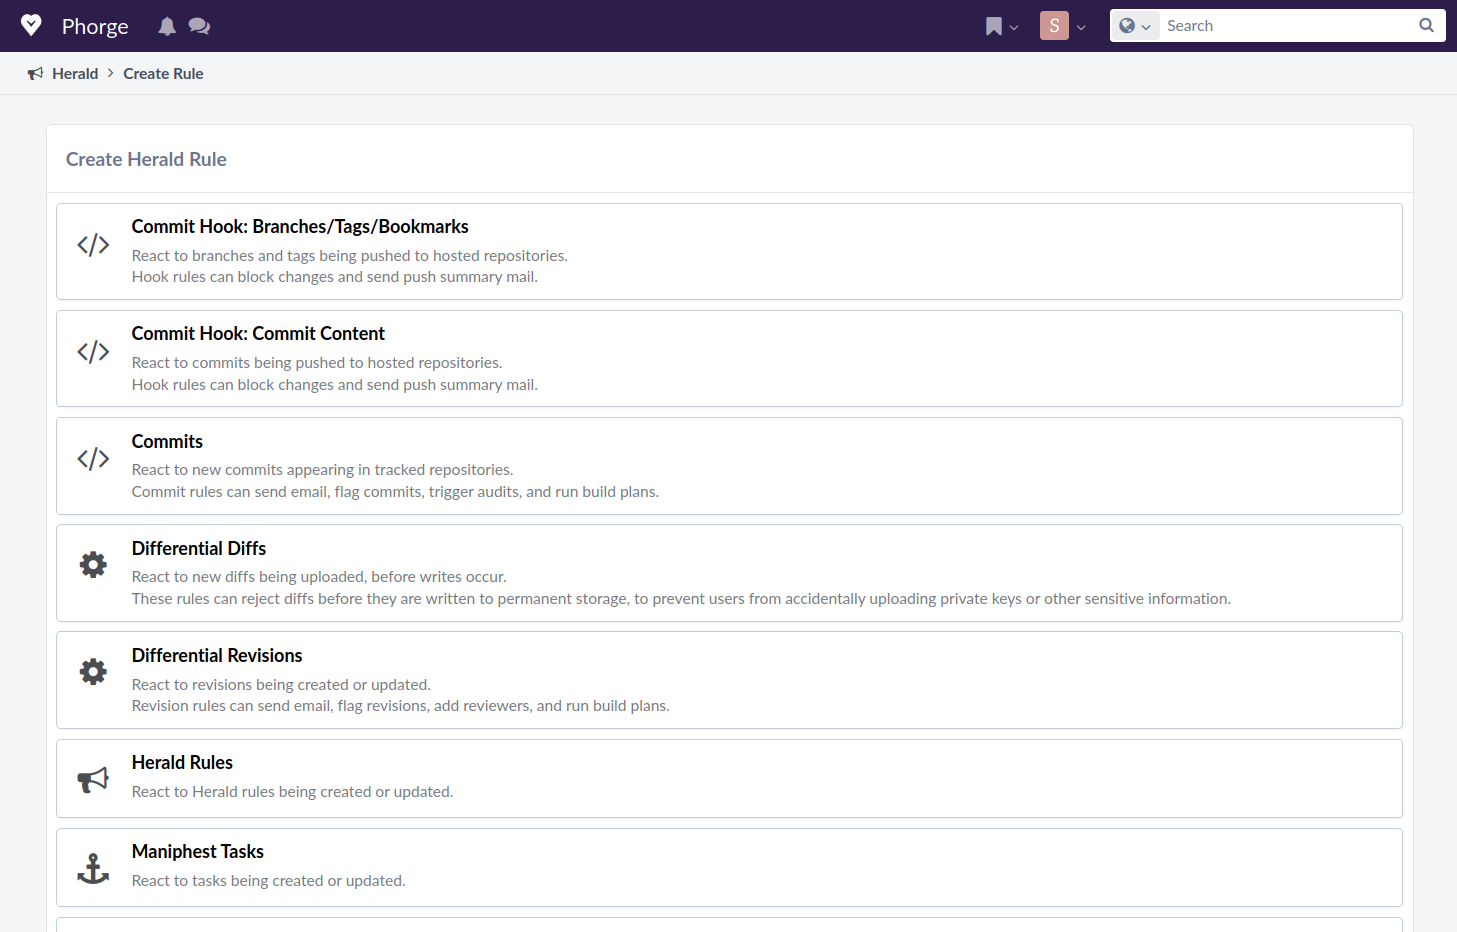
Then click on Global Rule.
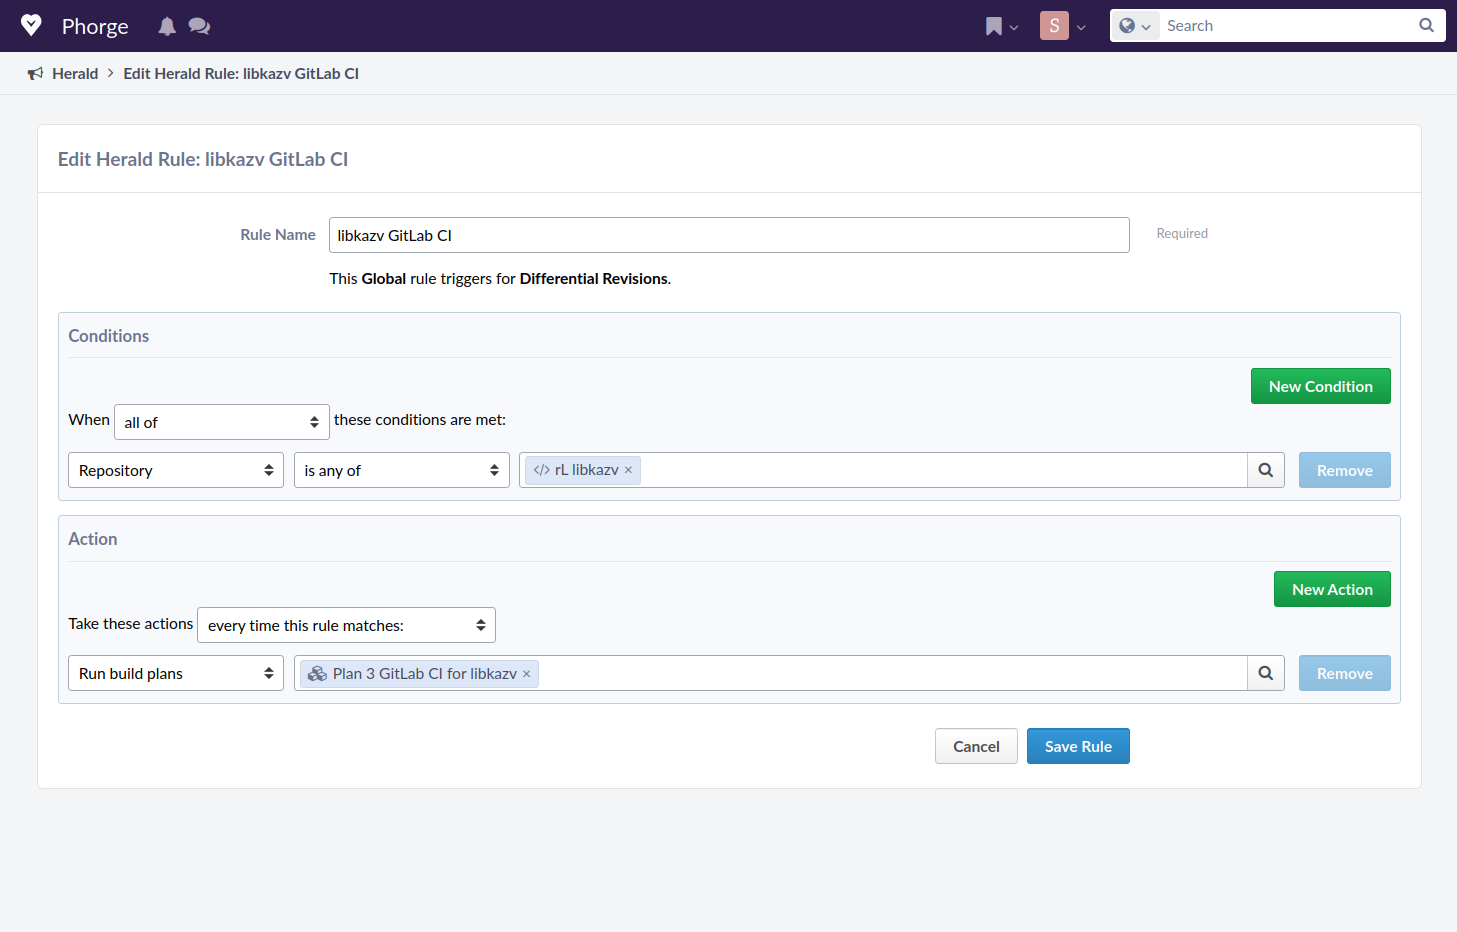
In Conditions, put Repository is any of, then enter the Phorge repository just created. In Action, choose every time this rule matches, and select Run build plans, then choose the build plan we just created.
Now change something else, use arc diff HEAD^ to create another diff.
It should push to the staging area (maybe it will prompt you for
credentials), and run the build plan automatically.
Reporting the results back to Phorge 把结果报回给 Phorge
We need to first generate a Conduit API Token for this. To do so, it is advised to use a separate Phorge account for it. Make sure that the Phorge account has access to the build plan and the diff. In your user settings page, go to Conduit API Tokens and click on Generate Token.
In the staging repository's CI/CD settings, add a variable, masked,
called CONDUIT_TOKEN, and paste the generated into it.
Add the following to your .gitlab-ci.yml of your main repository.
Also, add a stage prepare to the very beginning of the stages
and report to the end.
.report:
  image:
    name: 'reg.lily.kazv.moe/infra/phorge-ci-tools:servant'
  rules:
    - if: $TARGET_PHID
      when: always
    - when: never
  before_script:
    - pipelineUrl="$CI_PROJECT_URL"/-/pipelines/"$CI_PIPELINE_ID"

report-start:
  extends: .report
  stage: prepare
  script:
    - 'echo "{\"receiver\": \"$TARGET_PHID\", \"type\": \"work\", \"unit\": [{\"name\": \"GitLab CI (information only)\", \"result\": \"skip\", \"details\": \"$pipelineUrl\", \"format\": \"remarkup\"}]}" | /tools/arcanist/bin/arc call-conduit --conduit-uri https://iron.lily-is.land/ --conduit-token "$CONDUIT_TOKEN" -- harbormaster.sendmessage'

report-success:
  extends: .report
  rules:
    - if: $TARGET_PHID
      when: on_success
    - when: never
  stage: report
  script:
    - 'echo "{\"receiver\": \"$TARGET_PHID\", \"type\": \"pass\"}" | /tools/arcanist/bin/arc call-conduit --conduit-uri https://iron.lily-is.land/ --conduit-token "$CONDUIT_TOKEN" -- harbormaster.sendmessage'

report-failure:
  extends: .report
  rules:
    - if: $TARGET_PHID
      when: on_failure
    - when: never
  stage: report
  script:
    - 'echo "{\"receiver\": \"$TARGET_PHID\", \"type\": \"fail\"}" | /tools/arcanist/bin/arc call-conduit --conduit-uri https://iron.lily-is.land/ --conduit-token "$CONDUIT_TOKEN" -- harbormaster.sendmessage'
Update the diff to include the changes. Then you will be able to see the pipeline run, and the link to the pipeline can be found on the Buildable page. Here is an example.
] git add .gitlab-ci.yml
] git commit --amend
] arc diff HEAD^
And code coverage? 还有代码覆盖呢?
Another good thing from GitLab is code coverage visualization. On the merge request page, you can see which lines are covered and which are not. GitLab takes an XML file in cobertura format. Phorge, on the other hand, uses a different format, which is a mapping from file names to a string indicating the lines covered.
Luckily, there is a tool called [pycobertura][pycob] that can help us do the conversion. I created a script to convert cobertura XML files to a JSON in Phorge's coverage format.
We can add the following to the .gitlab-ci.yml in the main repository.
Assuming your previous jobs give you a cobertura XML in build/coverage.xml
and you collect it as an artifact, the coverage-report job generates a
HTML file visualizing the code coverage in addition to the JSON.
The upload-coverage job sends the coverage information to Harbormaster,
so you can view it in the Differential Revision. Here is an example.
The coverage-vis stage should be after the stage where your coverage job
is run, and the coverage-upload stage should be after coverage-vis, but
before report (this is important, because the report stage marks the
build as final, and you cannot change the status any more).
'coverage-report':
  rules: *build-rules
  stage: coverage-vis
  image: 'reg.lily.kazv.moe/infra/phorge-ci-tools/pycobertura:servant'
  script:
    - pycobertura show ./build/coverage.xml --format html --output ./build/coverage.html --source .
    - /tools/cobertura-to-phorge ./build/coverage.xml . > ./build/coverage.json
  artifacts:
    name: ${CI_JOB_NAME}-${CI_COMMIT_REF_NAME}-${CI_COMMIT_SHA}
    paths:
      - build/coverage.html
      - build/coverage.json

upload-coverage:
  extends: .report
  stage: coverage-upload
  rules:
    - if: $TARGET_PHID
      changes: *src-chg
      when: always
    - when: never
  script:
    - '{ echo "{\"receiver\": \"$TARGET_PHID\", \"type\": \"work\", \"unit\": [{\"name\": \"Test coverage\", \"result\": \"pass\", \"details\": \"$pipelineUrl\", \"format\": \"remarkup\", \"coverage\":"; cat build/coverage.json; echo "}]}"; } | /tools/arcanist/bin/arc call-conduit --conduit-uri https://iron.lily-is.land/ --conduit-token "$CONDUIT_TOKEN" -- harbormaster.sendmessage'